Sanding teak trim

The friendliest place on the web for anyone who enjoys boating.
If you have answers, please help by responding to the unanswered posts.
Joined
Mar 12, 2023
Messages
21
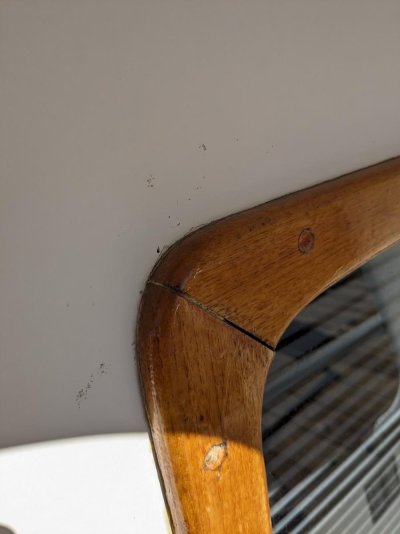
Time for refinishing the teak on my 38' Cheer Mens Trawler. I'm fairly woodworking savvy but am I missing something with a process other than drilling out teak bungs and removing trim to refinish. I'm mostly concerned with scratching the gelcoat, I get being diligent with blue painters tape ext but is there a tool that could speed up this process without removing? Anyone have a procedure/tool they'd care to share? PXL_20240317_175046876.jpg
 
No way would I take the trim off to do it. Too much risk of damage or new leaks. When sanding up next to gel coat I use a DA sander. I lay a wide 6” of so putty knife on the gel coat and turn the sander to go around the teak. It works well and gets pretty much all of the old varnish off. I have worn out several putty knives but it is well worth it.
 
No way would I take the trim off to do it. Too much risk of damage or new leaks. When sanding up next to gel coat I use a DA sander. I lay a wide 6” of so putty knife on the gel coat and turn the sander to go around the teak. It works well and gets pretty much all of the old varnish off. I have worn out several putty knives but it is well worth it.

A PIA, but would you share a mock-up picture of your method. T'would be most helpful. My guy epoxies defects like that, and finished from there. But I'm no expert.
 
A PIA, but would you share a mock-up picture of your method. T'would be most helpful. My guy epoxies defects like that, and finished from there. But I'm no expert.

Since I don’t have a speck of teak on our current boat it will be difficult to get a photo of how I do it. I can take a photo of a piece of wood screwed to a piece of plywood to simulate it if that would help. Let me know and I will take a photo of it.
 
Use a heat gun and putty knife to lift the old varnish off. It’ll save a crapload of sanding.
I use painters tape when sanding, but I also sand by hand using sanding blocks of various shapes. It’s not as fast as machine sanding, but I enjoy the process.
Be sure to fill any gaps and cracks like the one shown as that’s a spot for coating failure from moisture. G flex, or 610 works, as do many other things.
 
Since I don’t have a speck of teak on our current boat it will be difficult to get a photo of how I do it. I can take a photo of a piece of wood screwed to a piece of plywood to simulate it if that would help. Let me know and I will take a photo of it.

Como,
That would be very kind, and not worth doing for me unless it is really no problem. I am imagining you are using the wide blade to protect the gel coat from damage while sanding the adjacent teak, does that sound right?
 
No way would I take the trim off to do it. Too much risk of damage or new leaks. When sanding up next to gel coat I use a DA sander. I lay a wide 6” of so putty knife on the gel coat and turn the sander to go around the teak. It works well and gets pretty much all of the old varnish off. I have worn out several putty knives but it is well worth it.

Oops. I forgot to ask what is a "DA sander"?
 
I used a heat gun and a peanut scraper. Go to my blog, grandbankschoices, and dig around and find the write up. A heat gun is fastest but you must be careful or you can toast the wood. Scraper must be kept sharp. I bought about six cause they would get so hot they would melt in my hands.

Use lots of tape, blue then something with foil to stop the heat from melting the gel coat. Light sanding and refinish with AWLWOOD. You use anything else and your wasting your time.
 
Yep, what they say.

Do not remove the trim and use a heat gun to remove the old varnish.
 
The putty knife is also useful when applying the coating of your choice -- simply hold the knife against the gel coat where you are working. Six inches is a minimum size -- I use a 12" drywall blade for straight wood. You need a rag which you can wipe the blade on frequently -- or wear and old shirt.


Jim
 
Como,
That would be very kind, and not worth doing for me unless it is really no problem. I am imagining you are using the wide blade to protect the gel coat from damage while sanding the adjacent teak, does that sound right?

Yes, that is exactly what I use it for.

DA is a dual action sander.
 
I like using a carbide scraper with the heat gun, but it requires a steady hand to keep off the gelcoat. I'll 2nd the Awlwood. Unless you like repeating this process at closer intervals. It goes on faster, multiple coats in a day, it lasts MUCH longer, and worth every penny. I like foam brushes, only ones to use are JENN. Best piece of advice for coating is to COAT. Get it on evenly and QUICKLY. Then leave it alone. I usually have a second set of eyes peeled for sags & holidays, if you can't get them before they tack, leave 'em; fix 'em when they're dry. Don't try to coat in the wind!
 
Dual or double action sander. It spins and oscillates at the same time to reduce sanding marks.

So, otherwise known as a random-orbital sander? Is that right?
 
Use a heat gun and putty knife to lift the old varnish off. It’ll save a crapload of sanding.
I use painters tape when sanding, but I also sand by hand using sanding blocks of various shapes. It’s not as fast as machine sanding, but I enjoy the process.
Be sure to fill any gaps and cracks like the one shown as that’s a spot for coating failure from moisture. G flex, or 610 works, as do many other things.

B - since you enjoy the process and you know I have hand rails shedding their skin like a snake, I looking forward to seeing you and the missus.:)
 
B - since you enjoy the process and you know I have hand rails shedding their skin like a snake, I looking forward to seeing you and the missus.:)

Lol, spring is coming! Looking forward to seeing you as well. Although I may have misplaced my scraper…
 
Time for refinishing the teak on my 38' Cheer Mens Trawler. I'm fairly woodworking savvy but am I missing something with a process other than drilling out teak bungs and removing trim to refinish. I'm mostly concerned with scratching the gelcoat, I get being diligent with blue painters tape ext but is there a tool that could speed up this process without removing? Anyone have a procedure/tool they'd care to share? View attachment 146452

Bahco SCRAPER at Amazon
 
I would try a 1" wide Hyde hooked scraper first. Yes there are carbide scrapers that don't need touching up with a file every few minutes but they aren't hooked. On the flat, an orbital sander or wider hooked scraper.
You can file the corners off one of the scraper blades to prevent scratching the gelcoat. I also wouldn't consider removing the teak.
 
Greetings,
I much prefer hooked scrapers. Replacement blades are cheap AND more importantly, they can be easily sharpened with a file. Carbide scrapers, while sharp and long lasting initially, cannot be readily sharpened. A sharp scraper is a happy scraper.
As mentioned, a corner can be rounded to minimize surrounding damage.
 
I used a heat gun and a peanut scraper. Go to my blog, grandbankschoices, and dig around and find the write up. A heat gun is fastest but you must be careful or you can toast the wood. Scraper must be kept sharp. I bought about six cause they would get so hot they would melt in my hands.

Use lots of tape, blue then something with foil to stop the heat from melting the gel coat. Light sanding and refinish with AWLWOOD. You use anything else and your wasting your time.

What is a “peanut scraper”?
 
Greetings,
I much prefer hooked scrapers. Replacement blades are cheap AND more importantly, they can be easily sharpened with a file. Carbide scrapers, while sharp and long lasting initially, cannot be readily sharpened. A sharp scraper is a happy scraper.
As mentioned, a corner can be rounded to minimize surrounding damage.

Agree: Definitely a sharp (& frequently sharpened) hook scraper.

Here's what I learned from the local pro who does all the Hinckleys, Back Coves, etc. locally:

Tape with the best quality blue tape.
Usually with a hook scraper and hand sanding, you will not need to retape before varnishing.
Use a heat gun judiciously. The old varnish will bubble, but if the previous had a layer or two of epoxy, well you are in for a lot of "fun", but it will splinter off eventually with the sharp scraper.
Do remove SS protective 1/8 round rub strips. It's faster, easier and you are not worried about leaks from non-penetrating fasteners. Most of us leave the stanchions in place & tape around their bases.
Use a narrow and very sharp chisel to put V's into all butt joints & scarf joints which you will varnish and subsequently tape before filling with Sika 291Uv or equivalent. If you don't, this will be an area of varnish failure 'cus it's wood and both sides must be able to swell and contract with the seasons.
Be prepared to remove the sealant on both inboard and outboard under-surfaces of the cap rail if the sealant is suspect. (This is a major PITA since it involves taping both the cap rail and the hull on both sides of the rail to get a neat seam of 291 post varnishing).
If you want an almost perfect final gloss finish, do not use an orbital or DA sander, because they cause undulations which you will see in the reflected light.
Use a 1/4 sheet sanding block and don't be afraid to go really coarse with the initial sanding - 80 or even 40 if need be. You will quickly see & remove the high points with a sanding block. With a decent 1/4 sheet block, it goes very quickly. You don't need very fine sanding before varnish 'cus the thinned coats will raise the grain to start anyway. Just remove any scratches or sanding marks (Which makes a strong case for always sanding with the grain initially)!
Then it's just varnishing (typically 8 coats +/-) until you get a final coat you like. This goes pretty quickly 'cus you can go to the boat in the early morning, wet sand despite any dew, hose it off and in warm temps, it's dry & you are ready to varnish within an hour before the sun gets too hot.
Retape both sides of each joint to seal (be sure to get the tape off before the sealant skins over), stand back and admire.
Subsequent annual varnish involves simplified taping, a quick wet sand and varnish right over the Sikaflex at the V'ed joints and the rail-hull joints usually 2 coats. Don't get sucked into waiting a few years or until you see peeling, the time to recoat is when it looks great but up close, you can see the early UV degradation in the topcoat-losing its lustre. At that point, it's an easy recoat taking at most 2 days.
Our other local marina loves Awlwood & others on these forums extol the virtues of using an epoxy or 2 part equivalent plus Varnish to extend the life of the brightwork. It seems to work, but when (not if, unfortunately) it fails, one usually has to go back to bare wood and the splintered 2 part/epoxy is nasty to work with, whereas the varnish technique can usually be touched up and recoated quickly and easily for many years.
 
Last edited:
Carbide scraper can be sharpened easily, you just need a green (silicon carbide) wheel on your grinder.

I developed a technique using a Bahco carbide scraper, an adjustable heat gun set to about 300 deg F, and various drywall knives. The triangular scraper blade, with the corners having a small radius. I heat the varnish until is it soft and rubbery - this is well below the bubbling temp - and it scrapes off easily to clean wood. I use the drywall knife against the gel coat so you can go right up against it with the scraper. The small radius on the scraper (around 1/64 or so) keeps it from getting underneath. It's pretty quick, leaves a surface almost ready to recoat (just a little finish sanding), and not much danger of hitting the gelcoat or paint. May not work for all finishes, but has worked very well for me to remove Epifanes.
 
Hook scraper for sure. Very easy to sharpen once you get the hang of it. Takes only seconds and do not have to take to the grinding wheel.

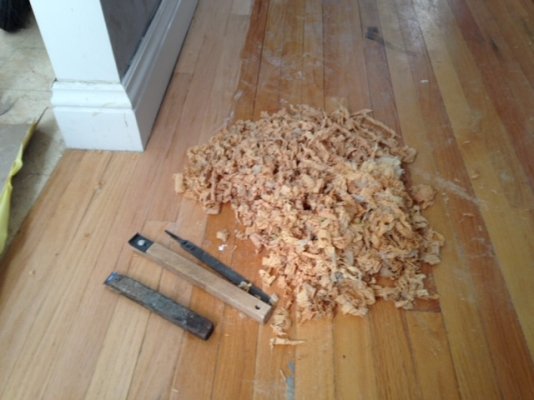
The attached photo is a 14' X 22' room. I scraped it rather than rough sand with the edger because I was staining and did not want to have to remove the edger circles before staining. The entire perimeter took about 20 minutes. In the foreground is a homemade scraper. The other is bought.

Rob
 

Attachments

  • Scraper.JPG
    Scraper.JPG
    98.2 KB · Views: 77
Greetings,
Mr. DDW. I agree one can easily sharpen carbide BUT you need a grinder and the special stone. Much handier IMO to have a file on the deck, readily at hand, grab it and give the hook blade a few passes and you're done. I've used both and I DO have the "green" wheel.


One thing I have done with the hook blade is cut one down to about 1/4" +/- with my Dremel tool and used it to ream out deck seams. You can easily heat that 1/4" tang with a torch and reshape the angle and profile. Again easy to sharpen.
 
All of the preceding responses accept removing the existing finish as a necessary part of refinishing. I have so much teak trim on my 1980 Taiwanese Trawler that the time it would take to do that complete refinishing is more than I have in two or even three summers.
So what i do is to lightly sand all of the teak that is in need of refinishing, scraping all of the holes in the existing finish with a 1" scraper, then apply a priming coat on any bare teak and one or two coats thereafter on all of the sanded boards. I usually have enough time to refinish about 1/3 of the teak on my boat each year, and the result is good enough to get complimented on its appearance regularly.
One downside of this approach was made apparent in 2021, when there was a heat dome that lasted about a week. In that heat dome, the ambient temperature rose to an unseasonable level that killed the inter tidal oysters and created a very smelly Desolation Sound vacation, but, to the point of this thread, blistered the varnish on one side of my boat so badly that I have been trying to rehabilitate it for the last 3 summers and have more to do this summer. The blistered varnish was, in most paces, where I had not needed to take the varnish off since I have had this boat, now some 30 years, so the colour difference between the newly varnished parts and nearby parts with thick but otherwise still good varnish, is pronounced.
 
I have watched several "pros" doing brightwork. They usually mask around the trim w/ Frog tape and apply a little heat with a heat gun (no flames) and scrape off the heaviest part. Then sand in place and refinish.
 
Time for refinishing the teak on my 38' Cheer Mens Trawler. I'm fairly woodworking savvy but am I missing something with a process other than drilling out teak bungs and removing trim to refinish. I'm mostly concerned with scratching the gelcoat, I get being diligent with blue painters tape ext but is there a tool that could speed up this process without removing? Anyone have a procedure/tool they'd care to share? View attachment 146452


Honestly, if the rest of the brightwork looks like this, then my opinion is you shouldn't need more than a light sand with 150, by hand. I really mean a "scuff", then go over with your favorite varnish because that doesn't appear failed (unless you want to start over for perfection).

My brightwork on both boats is epoxied, so unless I had delamination of the west or the topcoat varnish, the varnish gets a healthy "scuff" and Epifanes every 2 years (New England.... 6 months of UV exposure). Very similar to how some of the yacht yards I attend do it, and how bright work is done on some client's boats, but they do it more frequently because they're in the Med/Cbn for the winter. Very few folks I know (with the exception of some woodie lake boaters) truly varnish; that is a labor of love.
 
I've used & had very good luck w a card scraper.mI haven't used it on a boat but don't know why it wouldn't work the same as furniture.
It takes a little practice to "sharpen" but you are actually rolling the edge with a hardened "sharpening" stick. A portable vise yo hold the card make sharpening easy most anywhere.
A strip a painters tape on the edge towards the fiberglass prevents any unintentional gouges/ marks

Worth checking how to use & sharpen videos.
https://www.woodcraft.com/blogs/sho...wpbOTQfO9Ksxx7XSGD4aAg71EALw_wcB&gclsrc=aw.ds

Resulting finish is equal to fine sanding or better
 
Last edited:

Latest posts

Back
Top Bottom