Forkliftt
Guru
- Joined
- Oct 6, 2007
- Messages
- 2,450
- Location
- USA
- Vessel Name
- KnotDoneYet
- Vessel Make
- 1983 42' Present Sundeck
This may not be for everybody- and we are all grown ups and able to determine our risk tolerance, but for those possibly interested I snapped some pics a few weeks ago in case anyone is interested in adjusting their engine valves. This applies to the 135 only.
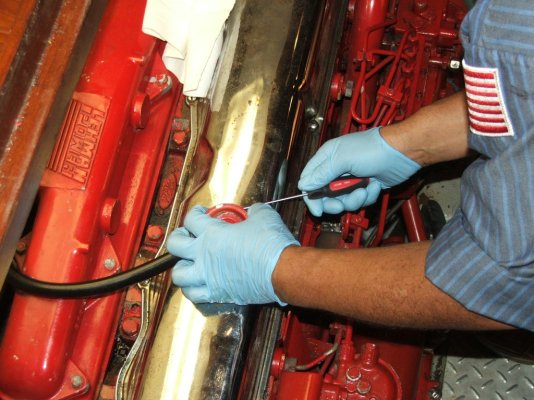
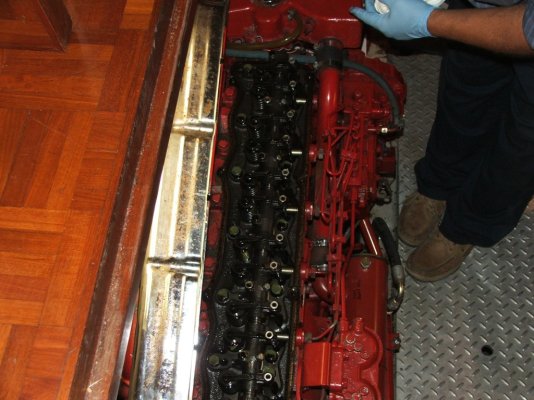
These first two pics are just removing the valve cover. The 135 valves are adjusted COLD. The intake and exhaust valves are both set at .015" clearance.*
The firing order is 153624. Many years ago I was taught to adjust engine valves using a "parenting cylinder" approach. The advantage is time and simplicity. Instead of two or more hand rotations of the engine you are able to set the valves in only one revolution. This works on any even number cylinder engine.*
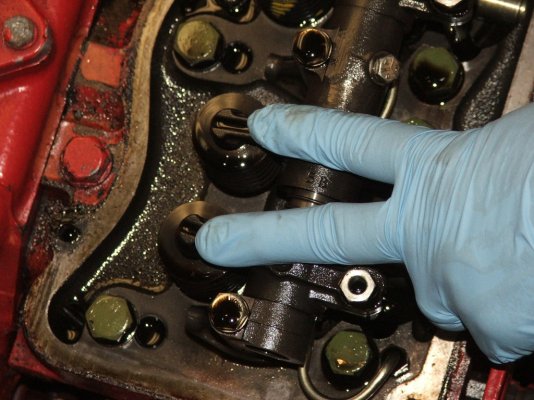
The third picture shows the firing order divided in half, so 1/6, 5/2, 3/4 work together. Use a wrench (4th picture) and spin the engine over until the rear cylinder rocker arms, #6, start to overlap. On a high compression engine you may have a hard time as you begin to spin because a cylinder is coming to the top of a compression stroke. If so, wait a few seconds and the compression will bleed past the rings. Overlap means that #6 exhaust valve is closing and #6 intake valve is beginning to open. It is critical that you find the exact location that both are moving at one time. I usually lay my fingers on the rocker arms (5th pic) and will rock the crankshaft back and forth to be sure I have the right spot.
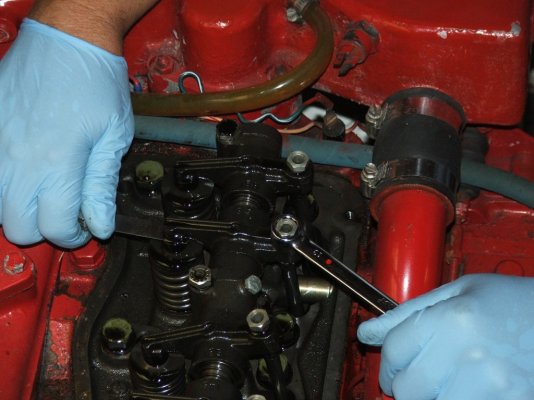
After you have #6 on overlap, you are ready to set the intake/ exhaust valves on #1 cylinder. The SP135 has friction adjusters, and these are easy to work with. More common are the type that have a flat screwdriver head and a jam nut. With the friction adjuster you simply turn it where you want it and it stays. Sometimes it is easier to remove the individual feeler gauge from the rest. The trick here is to*tighten the rocker arm adjuster until you feel a slight drag on the feeler gauge. You should be able to reinsert the gauge with slight pressure. Reset it 4 or 5 times if necessary to get a feel for it until you are happy with the result. After setting both valves, use your wrench to turn the crankshaft clockwise a few degrees until cylinder #2 *goes into overlap. Now you are ready to adjust both valves on cylinder #5. Next is #4 overlap, set #3. Then #1 overlap and set #6 valves.
Continue until 2 and 4 are adjusted, install a new valve cover gasket and you are finished!

These first two pics are just removing the valve cover. The 135 valves are adjusted COLD. The intake and exhaust valves are both set at .015" clearance.*
The firing order is 153624. Many years ago I was taught to adjust engine valves using a "parenting cylinder" approach. The advantage is time and simplicity. Instead of two or more hand rotations of the engine you are able to set the valves in only one revolution. This works on any even number cylinder engine.*
The third picture shows the firing order divided in half, so 1/6, 5/2, 3/4 work together. Use a wrench (4th picture) and spin the engine over until the rear cylinder rocker arms, #6, start to overlap. On a high compression engine you may have a hard time as you begin to spin because a cylinder is coming to the top of a compression stroke. If so, wait a few seconds and the compression will bleed past the rings. Overlap means that #6 exhaust valve is closing and #6 intake valve is beginning to open. It is critical that you find the exact location that both are moving at one time. I usually lay my fingers on the rocker arms (5th pic) and will rock the crankshaft back and forth to be sure I have the right spot.
After you have #6 on overlap, you are ready to set the intake/ exhaust valves on #1 cylinder. The SP135 has friction adjusters, and these are easy to work with. More common are the type that have a flat screwdriver head and a jam nut. With the friction adjuster you simply turn it where you want it and it stays. Sometimes it is easier to remove the individual feeler gauge from the rest. The trick here is to*tighten the rocker arm adjuster until you feel a slight drag on the feeler gauge. You should be able to reinsert the gauge with slight pressure. Reset it 4 or 5 times if necessary to get a feel for it until you are happy with the result. After setting both valves, use your wrench to turn the crankshaft clockwise a few degrees until cylinder #2 *goes into overlap. Now you are ready to adjust both valves on cylinder #5. Next is #4 overlap, set #3. Then #1 overlap and set #6 valves.
Continue until 2 and 4 are adjusted, install a new valve cover gasket and you are finished!


") . Keep us posted -
. Keep us posted -