34DC fuel tank replacement. Tanks?

The friendliest place on the web for anyone who enjoys boating.
If you have answers, please help by responding to the unanswered posts.

CharlieO.

Guru
Joined
Sep 21, 2020
Messages
1,805
Location
Lake Champlain Vermont, USA
Vessel Name
Luna C.
Vessel Make
1977 Marine Trader 34DC
Those that have changed fuel tanks on a Marine Trader/CHB 34DC.

What did you use for off the shelf tanks that didn't require an engine lift?

I followed Nick F and his posts and talked to him and that was the way I was going to go, but the cost of the custom made tank is a bit prohibitive right now.

I am not near my boat right now so still coming up with a plan to undertake this come March. I would like to be able to do 50 gallons on each side for now.

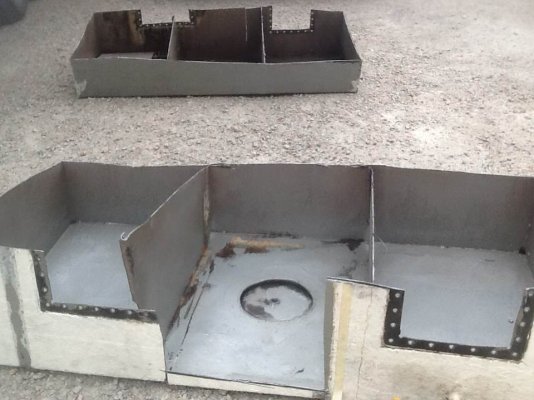
Two options maybe? 24" cube tank on each side. 9 1/2w x 57l x21h to slide between the engine and hatch, not sure if I can maneuver into place though.

I do plan on making a mock up before I actually order one. Just looking for ideas from people that have done it or been involved with the process. I am definitely open to ideas and tips and tricks.

Thanks!
 
I have a 36' MT Europa with from what I was told is an serviceable starboard tank. The phamplet for this boat states that the total fuel capacity is 350 gallons over 2 tanks. So I suppose the starboard tank is 175 gallons?

Reason it is unserviceable? No-one knows. From what I researched with the previous owners, the last 3 owners "got it that way".

I have not had a chance to thoroughly examine the tank. Maybe it leaks? I don't know.
I guess I will have to test it in the spring. Which is what brings me here.
I have no idea if these tanks can be easily extracted from where it sits.

One option is to dismantle the tank. Then what? I am hoping others here can post some comments on what options the OP and I might have.
 
Last edited:
Max, I will definitely be cutting out the old tanks. I'm hoping to put in a tank on either side without raising the engine or removing parts from the engine. My tanks are 150 gallons each side, going to smaller tanks isn't ideal but we need to move her come April and I need to consider time and expense right now.
 
How to cut out the tanks?

Blowtorch?
Angle grinder and cutting wheel?
Sawsall and hacksaw blade?

I was thinking if the tank comes out, what is wrong with fitting 3 smaller tanks into the same space and connecting them together?
 
How to cut out the tanks?

Blowtorch?
Angle grinder and cutting wheel?
Sawsall and hacksaw blade?

I was thinking if the tank comes out, what is wrong with fitting 3 smaller tanks into the same space and connecting them together?

Max -

Dont even think of torch (fire hazard) or grinder (iron dust which will get everywhere and will rust - also slower than Sawzall).

Other forum members have used Sawzall, as did I. See attached report for my boat.

OK to use 3 tanks - it just requires more plumbing. Total cost for the tanks will probably be higher, but this may still be a good compromise if it faciliates installation.

Regards,
Nick
 

Attachments

  • Cutting up a CHB34 fuel tank Rev1.pdf
    1.1 MB · Views: 113
Last edited:
I had my tanks replaced in 1995. It took all summer by a very experienced boatyard.


If I were you I would plumb in a small day tank to use for the trip to your home marina. When you get there you can decide what to do without pressure and time constraints.


Your trip from NJ to Lake Champlain is an easy ride with plenty of marinas for fuel stops.
 
Max, Sawzall and jigsaw are my planned methods of attack.

Al, That's why I will be happy with getting 100 gallons of tankage for now, then I could either add additional tank or tanks if needed, or pull the engine to put larger tanks in. I know if I do the latter my scope of works increases exponentially.

Either way, new smaller capacity tanks are more useful and valuable than the questionable ones in there now.
 
In our last boat I pulled the engines over 2 winters, 1 each winter, in order to clean up the bilge and do a lot of miscellaneous work. I built a crane out of a 6x6 I beam, 6x6 timbers and some 2x2 tube. Once I had the crane made the first engine took 2 hours to get up and over the other engine where I set it on some temporary stringers on deck in the salon. It took about 2 hours to reinstall the engine. The second engine came out in about 1.5 hours since we knew what we were doing. My point is that it really isn’t too difficult to pull an engine if you aren’t going to take it out of the salon. It would certainly make it easier to replace the fuel tanks.
 
I'm thinking a 20 to 30 gallon day tank. Something about the size of a holding tank. These things burn no more than 2 gallons an hour at 8 knots.
 
Comodave- I would love to pull the engine to the side to do this, just isn't time right now. I'm trying to get out of Liberty Landing April 1st. As soon as the weather warms up getting the bottom painted then back in the water, hopefully mid March. Our dock contract expires April 1st and I don't want to pay the transient rates. Liberty Landing Marina is very expensive, doesn't allow boat work on weekends, only they are allowed to do bottom paint(no diy bottom painting). We are only there because we assumed the remainder of the slip contract.

Al- It may be a possibility I go with smaller tanks but would like to get what I can while doing it in a minimally invasive procedure. I am going to try a couple mock ups to see what I can get in there. I'm going to go down next week, need to get something ordered soon so I have it in time.
 
Charlie - A couple of comments:

- I am told that for the CHB34 the transmission has to be removed in order to lift the engine up through the hatch. If true, this would make the engine move more difficult than what Comodave suggests.

- If you go multiple tanks each side you could start with one each side and add more later.

- Installing multiple tanks each side:
I was informed that inserting the tank through the forward ER hatch was done as follows:
Orient tank with inboard face downward.
Move down through the hatch.
Rotate 90deg about a fore-aft axis. Tank is now in correct orientation (top is now at the top and forward face continues facing forward).
Slide tank outboard.
Slide tank aft to final position

I can make sketches if this is confusing!

Regards,
Nick
 
Last edited:
Nick,

What size tanks would you be referring to? Of course I'd do mock up and trial fit.

If I did decide to move my engine, not sure I'd bring it all the way to the salon, maybe just lift it and move it to each side. If I got it all the way to the salon I'd be tempted to cut a hatch in the roof to pull it all the way out. I just have other things to attend to before I want to get into that.
 
Charlie - I will check with the other owner and forward his email to you. His tanks were each 28 x 28 x 19.5" high (overall dimensions). (My description of the insertion was not accurate)
 
Charlie - here are the overall dimensions of the tanks used on Salty. I calculate 52 USG per tank. Two tanks were installed each side. The owner told me that the angle in this drawing does not exactly match the ribs in the boat - you should get the correct angle by fitting a template in the boat.'
 

Attachments

  • Salty stbd tank detail.JPG
    Salty stbd tank detail.JPG
    25.5 KB · Views: 35
Here are some pictures of the multiple tanks going into Salty. Courtesy of Bck.
 

Attachments

  • IMG_20190924_140918160.jpg
    IMG_20190924_140918160.jpg
    91.4 KB · Views: 49
  • IMG_20210411_113845617.jpg
    IMG_20210411_113845617.jpg
    84.4 KB · Views: 50
  • IMG_20210411_114305462.jpg
    IMG_20210411_114305462.jpg
    82.2 KB · Views: 41
  • IMG_20191118_163906687-scaled.jpg
    IMG_20191118_163906687-scaled.jpg
    128.4 KB · Views: 41
  • IMG_20200213_053719826.jpg
    IMG_20200213_053719826.jpg
    77.9 KB · Views: 45
Hi Charlie & Nick,
Not all of those tank photos are mine Nick, same idea though...
Two 50 +- Gal aluminum tanks each side connected near bottom of inboard face (and top for venting). They were as big as I could get down there without moving the engine (I did have to remove HW tank (stb) and the fwd holding tank (portside).
 

Attachments

  • IMG_20210411_113329555.jpg
    IMG_20210411_113329555.jpg
    79 KB · Views: 38
  • IMG_20210411_122226635.jpg
    IMG_20210411_122226635.jpg
    83 KB · Views: 40
  • IMG_20210619_171732041.jpg
    IMG_20210619_171732041.jpg
    98.1 KB · Views: 42
Thanks Brian - I was puzzled by some of the details in the photos - now I know why. You are setting the standard for a clean job!
 
Thanks Brian, I planned on removing the water heater anyway, but my plastic holding tank is aft on the port side. I like what you did, part of my issue is the cost of sourcing aluminum to get custom built tanks, about 3X the cost of premade. I'm hoping the 24" cube (roughly 50 gal. volume)will be able to be maneuvered into place on each side.

Thanks
 
I'm thinking a 20 to 30 gallon day tank. Something about the size of a holding tank. These things burn no more than 2 gallons an hour at 8 knots.


That's what I did when repairing the tanks in the Green boat. The tanks were relatively easy to get out of the laz which I did. Then added 80# bags of concrete to keep the stern down. Each bag was wrapped in a heavy duty trash bag so I could use them later for an upcoming home project.

The laz held two tanks at 125 gallons each. So I figured 250 gallons X 7 lbs/gallon. That gave me 1,750 lbs of fuel plus the weight of the tanks so about 2,000 lbs.

A friend loaned me a 40 or 50 gallon tank which was strapped in between the original tank location. Five or six bags (don't remember exactly) of concrete were laid port and starboard in each tank location. It was good enough that I did not notice any change in trim and 40 or 50 gallons of fuel @ 2 gal./hour was plenty for the summer. I did carry a 5 gal jug just in case.

Probably did not need to take such elaborate steps.

Rob
 
Ha...no problem Nick!
Charlie, if your boat is similar, it has those ribs that the original tanks rest on. I made 3/4" plywood platforms to place the tanks on (with rubber blocks) as they otherwise would not sit on the ribs properly. Do you plan on having the 2' cube tanks mounted similarily?...on sloped platforms? Mock up a 2' cube with plywood to see if you can get them down in there.
My 4 tanks were $3000 here in BC by a small local fabricator, plus the ss fittings, hose,...and all the beer:)
 
Brian,

Yes, I would build platforms similar to what you did.
My local guy was 2300 per tank and a tank specific guy on the coast was 1650 each. Depending on what I can get to fit a premade is around $800 each delivered. Each option gave anywhere from 45-59 gallons per tank.
 
I have a Taiwanese 30' single engine diesel. I had to cut the original SS tanks out. I replaced them with smaller Vetus diesel approved tanks. I was carrying around way too much fuel with the original tanks.

The Vetus tanks are now ten years old. They were very easy to slide into the bilge on either side of the engine. No issues at all. 200Litre/50 gallons each.


The newer picture above are the same Vetus tanks reinstalled in the engine room last year when I had to replace the engine. I've had the boat since 1997. I don't have the exact tank dimensions, but I will get them for you. I agonized on building new matching tanks. I am glad I didn't. I can see the fuel and check for contamination. I have a fuel polishing system integrated as well.


Good luck with your project. I wish I could come and help you as I love doing that kind of work! Go slow as it isn't hard; nor should it be expensive if you hire an eager helper to cut out the old tank with a grinder. Take the top off first so you can get at the hidden fuel. Cheers.
 

Attachments

  • starboard fuel tank.jpg
    starboard fuel tank.jpg
    130.1 KB · Views: 40
  • Starboard tank is now fully aft.jpg
    Starboard tank is now fully aft.jpg
    113.9 KB · Views: 45
Cape Fear,
I wish I could get to the top of the tanks like your pictures. I'll have to start my attack on the inboard faces. Plan cutting into up high to clean out what I can.

What did you use for cutting?

Thanks, Charlie
 
I found there isn't enough room to cut from the top. We started by transferring all the fuel we could from the deck fill. Then with a reciprocating saw with a heavy duty metal/demolition Blade, cut off the inboard face first. Then scraped and cleaned out the thick crud in tank. We then cut the 5' long tank into fours cutting outwards along the top then down and finally along bottom being careful how far the blade got to the hull!
 
Two different shaped mock ups built, imitating IN STOCK off the shelf tank dimensions.
My preference would be the rectangular shaped one, but either would be fine.tank mock ups.jpg
 
Last edited:
Two different shaped mock ups built, imitating IN STOCK off the shelf tank dimensions.
My preference would be the rectangular shaped one, but either would be fine.View attachment 125830

Wow. You went all out. I was thinking if I make mock-ups I would make them out of cardboard. Good luck with the test fitting :)

I will be following closely because this is a job I will have to eventually tackle as well.
 
Thanks Max, it was stuff I already had kicking around. Although I did want them fairly sturdy do be sure I wasn't deforming the shape as work it into place. They will have to travel 4 hrs in the back of my truck. I'll be sure to update.

Good luck with your projects also!
 
We have a 34DC Marine Trader which I think is the same set up as you have. We had to remove the tanks two years ago, 150 gal each. We started trying to cut them out with a sawzall but wasn’t working, would have taken forever. Luckily my stepson does a lot of work on cars and came over with a plasma cutter. Cut through those tanks in a few hours. A lot of people advised me not to pull the engine to put in new tanks, I knew I would have to settle for smaller tanks but figured I would never have to worry about old fuel. The yard made mockups of tanks to see how big we could fit. They gave me the dimensions and I had a fabricator make the tanks for me. We ended up with 67 gal on each side The biggest expense was having the yard install them, new tanks, all new hoses and valves. They did an excellent job and took about one week. Was very pleased with the work even though we saved money on removing the old tanks and getting the tanks the installation did cost.Probably could have installed the tanks ourselves but decided not to.
 
Back
Top Bottom