Several people have expressed interest in a project I've mentioned and I thought the best way to share might be to post a thread outlining the project. Eventually I plan to add a "Project" to my Bacchus website but this is more expediant than modifying the website.
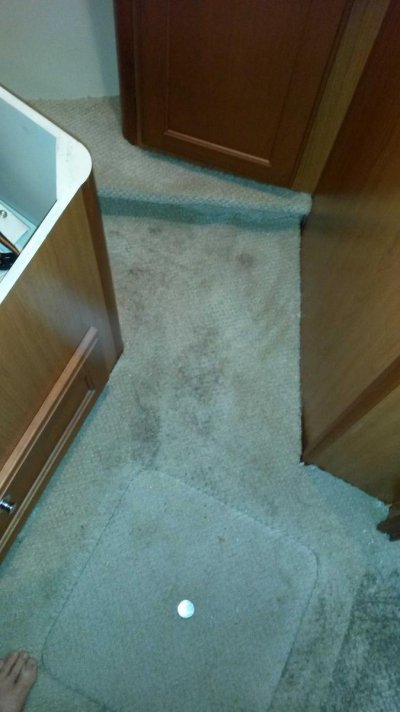
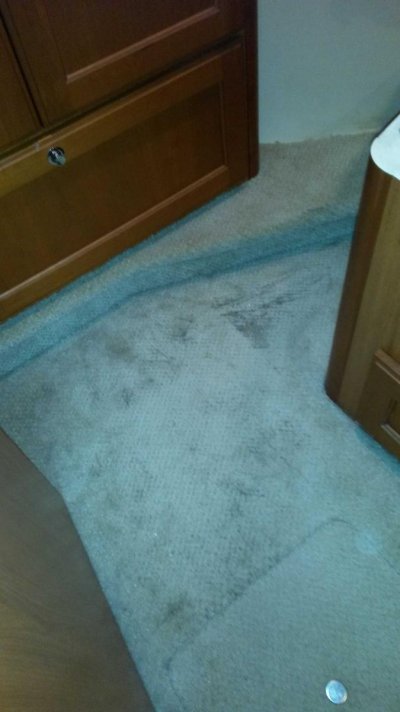
Our '08 MS 34HT Fwd Cabin carpet was in less than stellar shape when we bought the boat and replacement / upgrade was always on my long list of projects. My wife had little interest in carpet and I thought this was the opportunity to get rid of the only piece of factory "wall to wall" carpet. I explored several options and had prior experience on our last boat replacing a cabin sole w/ a plastic plank material that was water proof. It came out great but was a lot of work fitting the individual planks.
I had already added PlasDeck immitation teak to our aft / side decks and was very pleased w/ the results. MS used Plasteak sheet vinyl for our galley, head & saloon flooring and it was easy to keep clear and attractive. While exploring the PlasTeak for interior applications I noticed they also sold a thin sheet padding that could be used as a cushioning, sound absorbing layer. I was concerned that that would add the necessity to trim any hatch opennings which woupd prove difficult as the onein the fwd cabin had rounded corners. I inquired and was told that trim was optional but not necessary... the sheet vinyl over the pad without trim or edge support was done routinely. The factory provided samples and said that with a tight fitting hatch the edge & pad were barely visible and if noticable could be colored to match the flooring with a felt tipped furniture scratch repair pen or colored Sharpie.
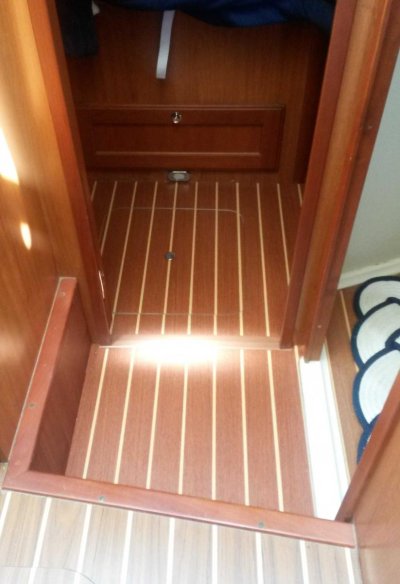
Decision made to go with teak & Holly to match the galley, head & saloon and to use the pad.
I made the template using Tyvek house wrap material (recommended by the factory) which is a good stable template material and more than adequate if there aren't a lot of hatches / cut outs req'd where they recommend a clear template material they also supply.
Their template tips helped a lot and I cut the material sightly undersize so it would lie perfectly flat. Cut "V" shaped opennings - folded the center of the "V" under and taped the template in several places to ensure it wouldn't move. next I made a one inch spacer block that would allow me to place it anywhere along an interior wall or verticle surface and draw the exact template shape one inch undersize on all locations except one - the entry doorway. The factory said to just indicate on the templates which lines were "actual" vs the one inch undersize and they would compensate.
I opted to have the factory cut my pad and flooring for the fwd cabin - I did the cutting of the entryway immediately outside the cabin / head from the scrap piece from under the bed.
The factory advised and supplied 2 different adhesives - one for material being attached to fiberglass (pad to floor & verticle trim to risers) and a second for attaching the finished flooring to the pad.
Attachment was fairly easy and accomplished by laying out each layer to assure fit and placement - removing the top layer leaving the pada in place - rolling back approx half / one side of the bed, applying adhesive and unrolling the material onto the adhesive. I then rolled it with a hand roller to ensure adhesion. roll back the second half and repeat.
Repeat again for the top layer using the appropriate adhesive.
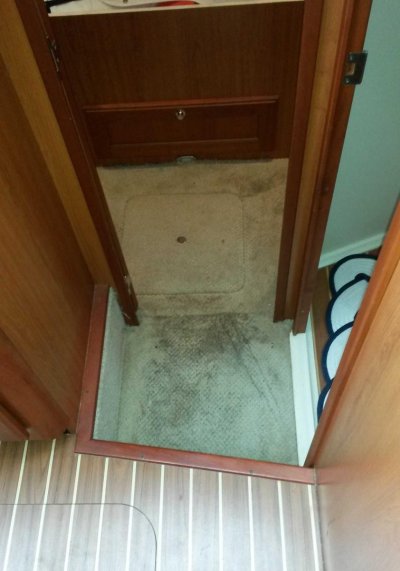
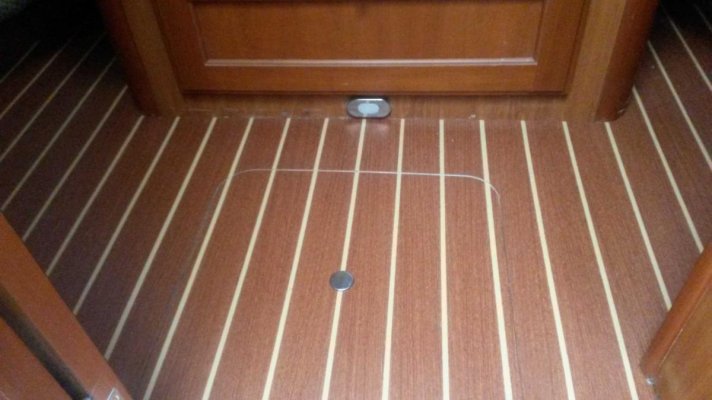
I left the hatch for last and actually did the work at home in the shop. Removing the carpet from the fiberglas opening and the hatch itself left a large gap. When I templated I made the edge of the floor the openning/ cut out. The mating piece they supplied had a very narrow cut kerf and fit closely. at home I simply cut a new hatch backing board to exactly match the hatch flooring and beveled the edge to provide clearance at the bottom / middle with the exact fit at the top. I glued the pad & finish flooring to the backer board. I made the board slightly under for thickness and added a thin layer of carpet non-skid to the lip that held the hatch to make it flush and quiet for placement.
Lastly I bought enough solid wood grained material (cherry w/ no holley strip) to use on the vertical risers that were carpeted. These include the steps on each side of the bed (I left the small odd shaped carpet on each step top) and the step up to the galley level.
Results more than met expectations and I have gotten many compliments on the look and feel - especially the soft feel with the pad under the vinyl.
Pics before w/ old stained carpet - after finished product.
unfortunately I was too busy to take any in-process shots while I went.
Any additional questions - shoot me a PM - happy to answer them.
Our '08 MS 34HT Fwd Cabin carpet was in less than stellar shape when we bought the boat and replacement / upgrade was always on my long list of projects. My wife had little interest in carpet and I thought this was the opportunity to get rid of the only piece of factory "wall to wall" carpet. I explored several options and had prior experience on our last boat replacing a cabin sole w/ a plastic plank material that was water proof. It came out great but was a lot of work fitting the individual planks.
I had already added PlasDeck immitation teak to our aft / side decks and was very pleased w/ the results. MS used Plasteak sheet vinyl for our galley, head & saloon flooring and it was easy to keep clear and attractive. While exploring the PlasTeak for interior applications I noticed they also sold a thin sheet padding that could be used as a cushioning, sound absorbing layer. I was concerned that that would add the necessity to trim any hatch opennings which woupd prove difficult as the onein the fwd cabin had rounded corners. I inquired and was told that trim was optional but not necessary... the sheet vinyl over the pad without trim or edge support was done routinely. The factory provided samples and said that with a tight fitting hatch the edge & pad were barely visible and if noticable could be colored to match the flooring with a felt tipped furniture scratch repair pen or colored Sharpie.
Decision made to go with teak & Holly to match the galley, head & saloon and to use the pad.
I made the template using Tyvek house wrap material (recommended by the factory) which is a good stable template material and more than adequate if there aren't a lot of hatches / cut outs req'd where they recommend a clear template material they also supply.
Their template tips helped a lot and I cut the material sightly undersize so it would lie perfectly flat. Cut "V" shaped opennings - folded the center of the "V" under and taped the template in several places to ensure it wouldn't move. next I made a one inch spacer block that would allow me to place it anywhere along an interior wall or verticle surface and draw the exact template shape one inch undersize on all locations except one - the entry doorway. The factory said to just indicate on the templates which lines were "actual" vs the one inch undersize and they would compensate.
I opted to have the factory cut my pad and flooring for the fwd cabin - I did the cutting of the entryway immediately outside the cabin / head from the scrap piece from under the bed.
The factory advised and supplied 2 different adhesives - one for material being attached to fiberglass (pad to floor & verticle trim to risers) and a second for attaching the finished flooring to the pad.
Attachment was fairly easy and accomplished by laying out each layer to assure fit and placement - removing the top layer leaving the pada in place - rolling back approx half / one side of the bed, applying adhesive and unrolling the material onto the adhesive. I then rolled it with a hand roller to ensure adhesion. roll back the second half and repeat.
Repeat again for the top layer using the appropriate adhesive.
I left the hatch for last and actually did the work at home in the shop. Removing the carpet from the fiberglas opening and the hatch itself left a large gap. When I templated I made the edge of the floor the openning/ cut out. The mating piece they supplied had a very narrow cut kerf and fit closely. at home I simply cut a new hatch backing board to exactly match the hatch flooring and beveled the edge to provide clearance at the bottom / middle with the exact fit at the top. I glued the pad & finish flooring to the backer board. I made the board slightly under for thickness and added a thin layer of carpet non-skid to the lip that held the hatch to make it flush and quiet for placement.
Lastly I bought enough solid wood grained material (cherry w/ no holley strip) to use on the vertical risers that were carpeted. These include the steps on each side of the bed (I left the small odd shaped carpet on each step top) and the step up to the galley level.
Results more than met expectations and I have gotten many compliments on the look and feel - especially the soft feel with the pad under the vinyl.
Pics before w/ old stained carpet - after finished product.
unfortunately I was too busy to take any in-process shots while I went.
Any additional questions - shoot me a PM - happy to answer them.