Had to open up the port fuel tank..always something.

The friendliest place on the web for anyone who enjoys boating.
If you have answers, please help by responding to the unanswered posts.
Joined
Dec 24, 2019
Messages
981
Location
New Port Richey, Fl
Vessel Name
M/V Intrigue
Vessel Make
1985 Tung Hwa Senator
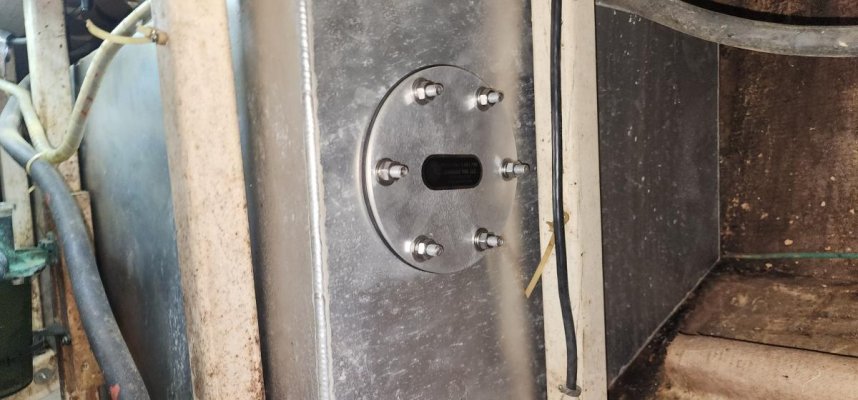
So this past week I was down at the boat. The plan was to check fluids and preflight to have the boat ready so I can take it out for a shakedown run. One additional thing on the list was to do a little fuel filtering on the port tank. Ever since I had the boat the racor showed water now and again. I tracked that to some bad threads on the port deck fuel fill. It made it feel like it was tight but the oring was just not quite seated. Replaced it. Tested the old one by turning it upside down over a cup and pouring water in it. Leaked immediately at a drop a second. So I wanted to cycle some fuel with a basic polishing set up I made on a dolly. Hooked it up just before the clicker pump on the perkins, routed the pump outlet to the port fill. This would route fuel under vacuum through the 900 racor.

After a few minutes i noticed a change in tone on the pump. Went to the racor and had vacuum in the red. Closed the port tank and opened the starboard. Vacuum dropped to near zero. Closed stbd and opened port...very high vacuum. Unhooked the line from the racor to top of tank and blew into it. After a few seconds of resistance it gave way and i heard bubbles in the tank. Hooked line back up and turned on fuel pump and quickly had high vacuum again.

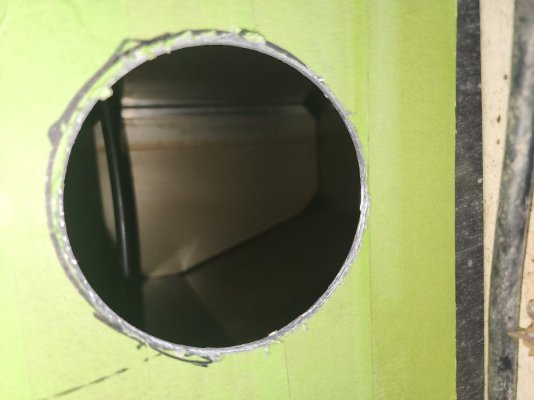
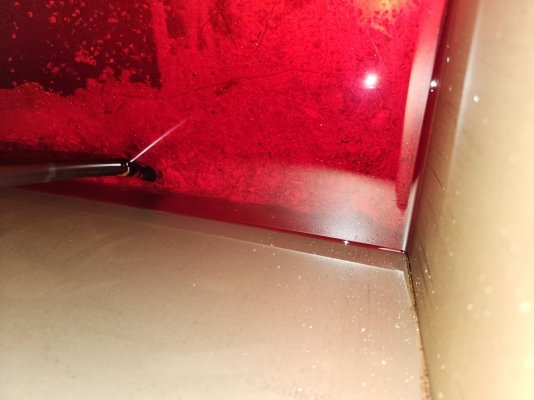
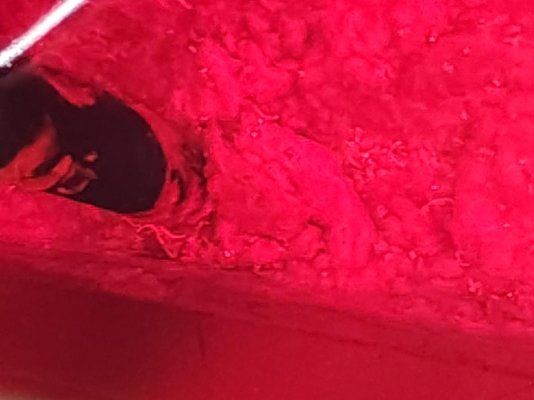
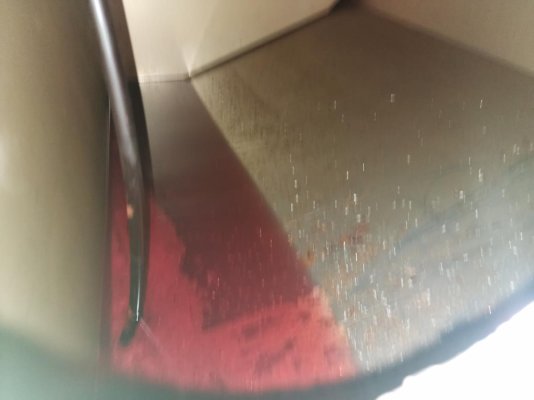
Next day had 60 gallons pulled out by a local fuel cleaning company, bought a 4 inch Milwaukee cutter for the Milwaukee hole saw kit, tapped around the tank to locate baffle and drill an exploritory hole. Used the endescope to take a peak. All clear. Used the 4 inch hole saw and cut a hole 2/3 the way up the front face of the tank, slightly inboard. Here is what I found. Looks like something out of a house of horrors...lol.
 

Attachments

  • 20230402_150349.jpg
    20230402_150349.jpg
    77.2 KB · Views: 102
  • 20230402_151008.jpg
    20230402_151008.jpg
    93.6 KB · Views: 106
  • 20230402_151030.jpg
    20230402_151030.jpg
    71.1 KB · Views: 99
  • 20230402_150403.jpg
    20230402_150403.jpg
    54.5 KB · Views: 99
Last edited:
The Sea Built access plate came in yesterday. Its somewhat pricey but this design seems best suited if the access plate has to be on the side of the tank. I vacuumed the remaining fuel and sludge out using the same fuel pump rig. Left some fuel absorbent pads inside to wick up whatever is left. This Saturday ill clean the tank manually with various poles, rags and whatever works along with some alcohol. Drill 6 holes with a bit of precision and install the plate.

I knew all along in the back of my mind I was going to have to open this tank at some point. Better now at the dock I guess. In addition to the microbial sludge I found that the dip tube is just too long. it sits right at the bottom of the tank and is probably restricting flow. I will shorten that about 3/4 of and inch and cut a taper. All in all I am actually quite happy tackling this now to get it out of the way. I will probably add an access plate to the starboard tank as well even though fuel from that side has always been spotless. Neither tank had any access ports. Just a note....top access was not an option.

https://www.fisheriessupply.com/seabuilt-tank-access-plate-system/aps-6
 
Last edited:
If we get another boat with steel or aluminum tanks, I am going to factor in access ports and internal tank inspection right from the get-go. I was amazed at the amount of sludge in our tanks when I cut them out.
 
What was the stuff in the tank?

Ted

Microbial growth and residue due to the excessive water in the tank over probably last 5 years. Some of it is soft but some of it is like small pebbles you can crush with your fingers.
 
If we get another boat with steel or aluminum tanks, I am going to factor in access ports and internal tank inspection right from the get-go. I was amazed at the amount of sludge in our tanks when I cut them out.
I replaced 50 year old steel tanks on Weebles a couple years ago - one had a small weep and I figured it was time. They were pretty clean inside which surprised me. That said, inspection ports are always welcomed.

Peter
 
Are those original tanks?

No..custom aluminum tanks the original owner had done about 5 or 6 years ago. His original iron tanks developed a leak. He also had excessive contaminants that stopped the motor on his way over to the marina. He took the boat to a Marina for repairs and ended up overhauling the Perkins including all marinized parts, transmission, all coolers, and had 2 new tanks made. Cost him $42k six years ago.

Anyways..the tank insides look good. Minus the shmutz.
 
That access plate cover is the answer to my prayers. Now I will cut into my tank this summer. I have been holding off due to the question of what to do with the hole after I cut it.

Was the six inch hole big enough to get your arms in?

pete
 
Was the six inch hole big enough to get your arms in?

pete

Its actually a 4 inch hole and a 6 inch plate. So obviously its 1 inch overlap around the circumference. I was able to get my arm in up to my lower bicep. Enough to bend my elbow down and grap some of the goop to analyze. They do make several sizes, all larger if needed.

I will probably use brushes and rags taped to various poles and things to get all the surface wiped down and then do a final vacuum for metal shavings.

One thing to add. In researching the best cover plate to use I saw atleast 1 mention of people using a wet/dry vac to remove the last bits of fuel. IMO I would not do that. Even though diesel is pretty darn safe to work around, any time it could be atomized to a fine mist IMO the danger goes way up.
 
Sands
Good catch on the water and fill cap. Maybe your vents are suspect too.

Those small crusty pebbles may be AlOH crystals. Double check the tanks bonding and any contact with other metals such as fuel lines, tie down straps, supports or tank valves.
 
B S were you using any additives like Biobor jf which is supposed to prevent this?

I have BioborJF on hand as well as a Fuelstat test kit. The Fuelstat is the best test kit bar none. But I have been holding off using both. The reason was I was sure I had some microbiological growth in the port tank. The question was how much. I was going to operate the boat and monitor the racors in the hopes that I would eventually have clear bowl after some regular operation. Then treat with biobor, then operate some more, then test with the Fuelstat and if good contnue the Mx dose of biobor. Turns out my suspicions were right, but worse than I figured. So of course now ill add the inspection plate, manually clean the tanks, and then I can start the regimen if biobor at a Mx dose. After I cycle through some fuel I will use the Fuelstat to check for bugs again in maybe 6 months. Atleast thats the current plan.

I really consider this a blessing to catch it now. I have been refurbing this boat for a little over 2 years or so. Another week or two isnt going hurt and I can finally and conclusively get rid of that nagging issue of the unknown condition of the port tank once and for all. I am actually somewhat excited about it.
 
Sands
Good catch on the water and fill cap. Maybe your vents are suspect too.

Those small crusty pebbles may be AlOH crystals. Double check the tanks bonding and any contact with other metals such as fuel lines, tie down straps, supports or tank valves.

Will do. I will do some more research on that and take another look. Thanks for the tip. One point of comparison is the starboard tank. Its always clean as a whistle. But I will probably open that one too at a later convenient date. I want to check the pick up tube and just add the inspection panel just to have it.
 
B S I am glad you found issue and can resolve. I have used biobor as a preventative for this and was concerned if you also used it or something regularly it did not make a difference.
 
B S I am glad you found issue and can resolve. I have used biobor as a preventative for this and was concerned if you also used it or something regularly it did not make a difference.

No...Biobor works. Its essentially the main treatment prescribed by many Aviation Engineers for the Aircraft they make. I have been using it for probably 20 to 25 years on Aircraft. Especially if they are South American operators.
 

Attachments

  • 20230405_113156.jpg
    20230405_113156.jpg
    85 KB · Views: 60
The Sea Built access plate came in yesterday. Its somewhat pricey but this design seems best suited if the access plate has to be on the side of the tank. I vacuumed the remaining fuel and sludge out using the same fuel pump rig. Left some fuel absorbent pads inside to wick up whatever is left. This Saturday ill clean the tank manually with various poles, rags and whatever works along with some alcohol. Drill 6 holes with a bit of precision and install the plate.

I knew all along in the back of my mind I was going to have to open this tank at some point. Better now at the dock I guess. In addition to the microbial sludge I found that the dip tube is just too long. it sits right at the bottom of the tank and is probably restricting flow. I will shorten that about 3/4 of and inch and cut a taper. All in all I am actually quite happy tackling this now to get it out of the way. I will probably add an access plate to the starboard tank as well even though fuel from that side has always been spotless. Neither tank had any access ports. Just a note....top access was not an option.

https://www.fisheriessupply.com/seabuilt-tank-access-plate-system/aps-6
You seem to know what you are doing but if it was my project I wouldn't shorten
the dip tube very much. Doing so will cost you range and allow that much more
junk to accumulate that your fuel filters could have trapped earlier before a lot of
accumulation. If it's really close to the bottom maybe add a few notches for flow.
JMHO.
 
Last edited:
You seem to know what you are doing but if it was my project I wouldn't shorten
the dip tube very much. Doing so will cost you range and allow that much more
junk to accumulate that your fuel filters could have trapped earlier before a lot of
accumulation. If it's really close to the bottom maybe add a few notches for flow.
JMHO.

Yes, I looked at the inside of the tank with the remaining fuel and location of pick up tube for a solid 15 minutes contemplating that aspect...lol. in the picture you can see the pick up is well below the fuel line. Maybe 1.25 inches lower than the remaining fuel level. The pickup tube was hard against the bottom. I sucked the remaining fuel out using a seperate pump. It came to about 2.5 gallons (what you see in the picture). So you can somewhat gauge how much you might cut off vs how much "unuseable fuel" might remain vs what amount of water might stay on the bottom if too short. I came up with clipping 3/4. I may do a taper I may do 4 notches. I am still doing the mental calibration on that topic..lol. So all input is welcome and appreciated.
 
Last edited:
I'd taper the end of the dip tube, but I'd keep it as close to the bottom as you can without restricting flow. No reason to leave more unusable fuel or sludge behind than necessary.
 
I can only imagine if you do not draw from the bottom that eventually the bottom comes up to meet the intake. Would rather put a little through the filters than let a layer of sludge build for lack of circulation.
 
I can only imagine if you do not draw from the bottom that eventually the bottom comes up to meet the intake. Would rather put a little through the filters than let a layer of sludge build for lack of circulation.

Last two posts...good points. Ill cut a decent taper in it first and see how that looks to me. Now that the inspection panel is in I can always open it back up and change things.
 
The Sea View Inspection port is installed now. All in all it wasnt a bad job. Worst part was paying someone to take the fuel away. The other part was just access to the area and then cleaning out the tank through a 4 inch hole. After cleaning I was able to get a good view of the pick up. It was already cut at an angle at the tip. Problem was when the pickup was put in its tightens from the top of course and just by chance that angle happened to just about perfectly match the angle of the bottom of the tank and it was hard against it. It was obviously a major restriction from the day that tank was commissioned. All the water and crud just made it that much worse. I cut about 2mm off it and then cut another taper to make two opposing tapers like a bird beak. ><

Now I need to clean out the Racor bowl and change the filter and then put about 35 gallons in this side. Ill then transfer the 65-70 gallons from the stbd side into the port to fill it up for leak checks. That way if there is an issue I can transfer the full quantity back into stbd side. Here are a few pics of the Sea View installed. I highly recommend the product.
 

Attachments

  • Sea Built plate1.jpg
    Sea Built plate1.jpg
    95.5 KB · Views: 47
  • Sea Built plate.jpg
    Sea Built plate.jpg
    121.3 KB · Views: 48
No..custom aluminum tanks the original owner had done about 5 or 6 years ago. His original iron tanks developed a leak. He also had excessive contaminants that stopped the motor on his way over to the marina. He took the boat to a Marina for repairs and ended up overhauling the Perkins including all marinized parts, transmission, all coolers, and had 2 new tanks made. Cost him $42k six years ago.

Anyways..the tank insides look good. Minus the shmutz.

Interesting post B S, appreciate all the info provided.

I do keep reading how owners spend big money/time/effort into new tanks and fuel systems, yet don’t install inspection plates, for just a few hundred more?!
 
I can only imagine if you do not draw from the bottom that eventually the bottom comes up to meet the intake. Would rather put a little through the filters than let a layer of sludge build for lack of circulation.

Excellent point!
 
Interesting post B S, appreciate all the info provided.

I do keep reading how owners spend big money/time/effort into new tanks and fuel systems, yet don’t install inspection plates, for just a few hundred more?!

I have never had custom marine fuel tanks made. But my dock neighbor recently had some done. The guy who made them followed the ABYC code and he did actually pressure test them to the required psi. My nieghbor wanted him to install access panels but the fabricator refused. It sounded like the fabricator was leary about passing the pressure test with access panels installed. I think he was also concerned about liability. I am sure not all fabricators take that stance. But I can see why some might.

I am pretty confidant the Sea View could pass the pressure test.

SV look like a quality arrangement.
 
The Sea Built access plate came in yesterday. Its somewhat pricey but this design seems best suited if the access plate has to be on the side of the tank. I vacuumed the remaining fuel and sludge out using the same fuel pump rig. Left some fuel absorbent pads inside to wick up whatever is left. This Saturday ill clean the tank manually with various poles, rags and whatever works along with some alcohol. Drill 6 holes with a bit of precision and install the plate.

I knew all along in the back of my mind I was going to have to open this tank at some point. Better now at the dock I guess. In addition to the microbial sludge I found that the dip tube is just too long. it sits right at the bottom of the tank and is probably restricting flow. I will shorten that about 3/4 of and inch and cut a taper. All in all I am actually quite happy tackling this now to get it out of the way. I will probably add an access plate to the starboard tank as well even though fuel from that side has always been spotless. Neither tank had any access ports. Just a note....top access was not an option.

https://www.fisheriessupply.com/seabuilt-tank-access-plate-system/aps-6
A trick I have employed for years for cleaning diesel tanks is to use a 5 gal pail with a tight sealing top. I cut one hole in the lid to fit my shop vac hose and another for a flexible 1/2" PVC hose. Seal both tubes to the lid with duct tape. The shop vac creates vacuum in the pail which allows the PVC hose to suck up whatever is in the tank. The fuel/crap mixture drops into the pail. It should go without saying that this should NOT be used for gasoline.
 
A trick I have employed for years for cleaning diesel tanks is to use a 5 gal pail with a tight sealing top. I cut one hole in the lid to fit my shop vac hose and another for a flexible 1/2" PVC hose. Seal both tubes to the lid with duct tape. The shop vac creates vacuum in the pail which allows the PVC hose to suck up whatever is in the tank. The fuel/crap mixture drops into the pail. It should go without saying that this should NOT be used for gasoline.

Great tip!

In the end I used a pump set up that I had on hand to suck out the remaining fuel/gunk mix. About 2.5 gallons worth. If I didnt already have a strong pump I would have definitely used the vacuum/5 gallon bucket method.
 
I have never had custom marine fuel tanks made. But my dock neighbor recently had some done. The guy who made them followed the ABYC code and he did actually pressure test them to the required psi. My nieghbor wanted him to install access panels but the fabricator refused. It sounded like the fabricator was leary about passing the pressure test with access panels installed. I think he was also concerned about liability. I am sure not all fabricators take that stance. But I can see why some might.

I am pretty confidant the Sea View could pass the pressure test.

Hi Barking Sands. I suggest you recommend your neighbor get a new tank fabricator, and purchase adequate marine fuel tanks. A pressure test is MANDATORY under the CFRs (183.510 Fuel tanks) for both gasoline and diesel, and inspection plate(s) penetrations are allowed for diesel tanks. And yes, Seabuilt inspection plates (https://www.seabuilt.com/) will hold the inspection pressure. Any tank fabricator that refuses to install adequate inspection plates in diesel fuel tanks upon request isn't worthy of consideration. And I'd be way more concerned for my own personal liability and safety using tankage from such a wonky fabricator.
Regards,
Pete
 
Back
Top Bottom